Pages

Monday, March 25, 2013

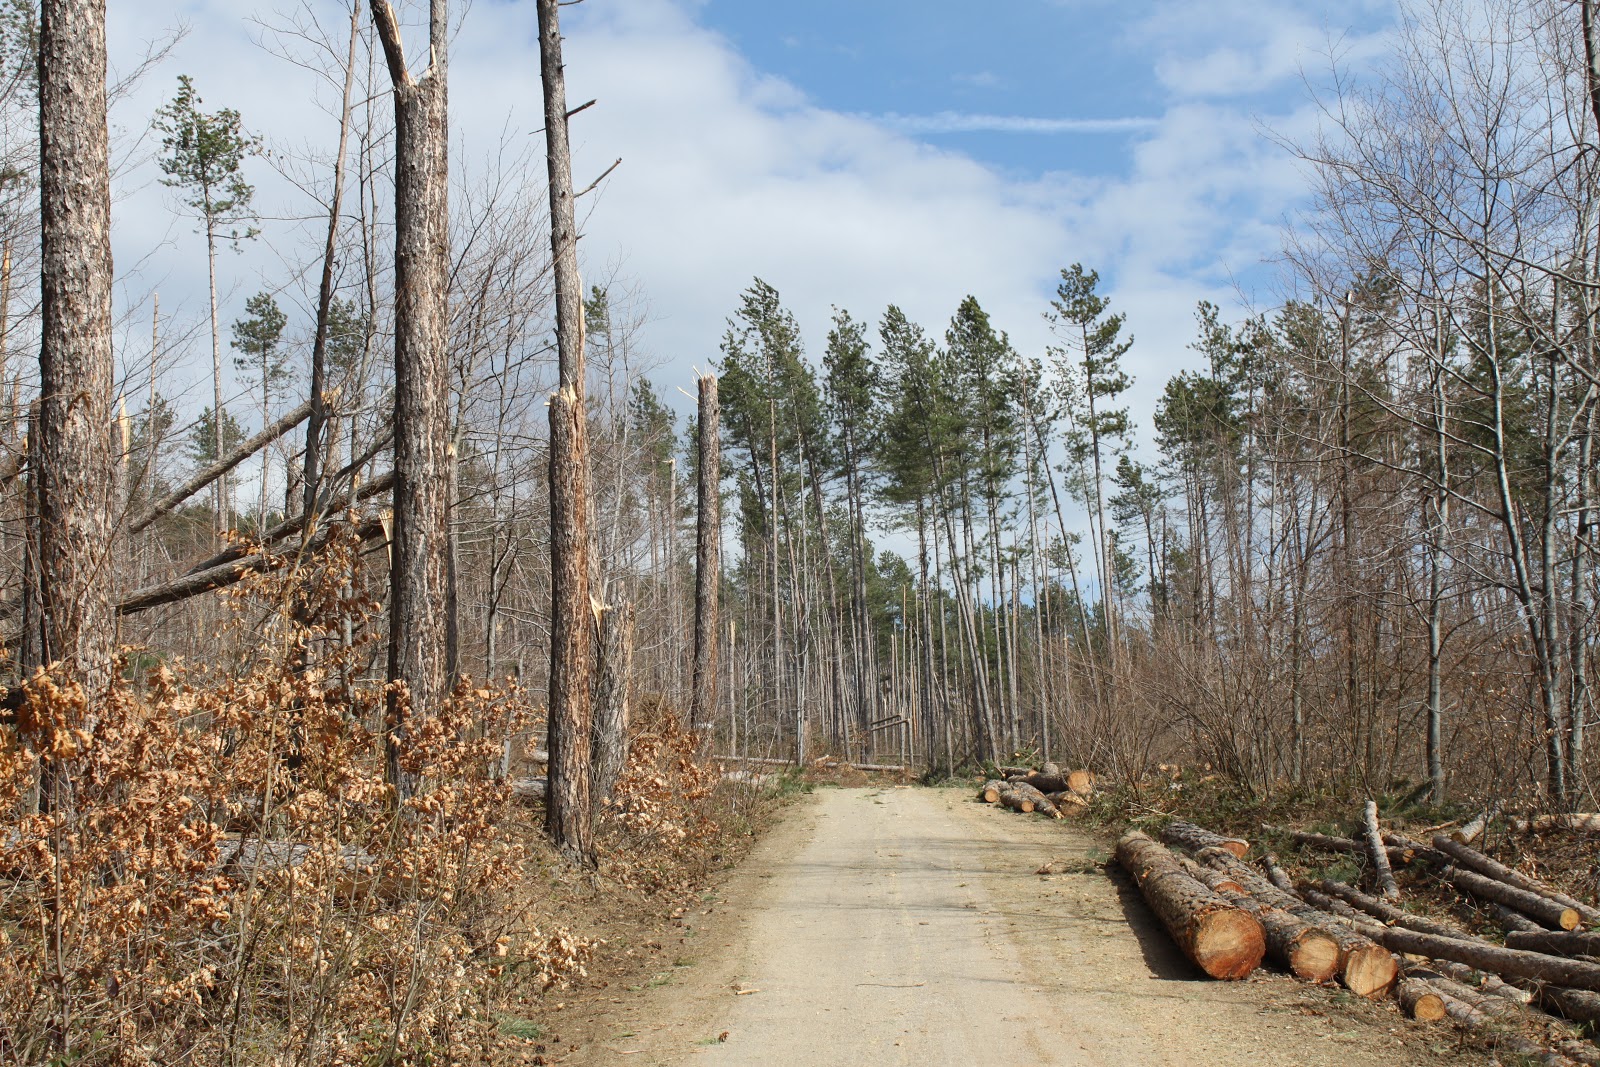
Ураганен вятър в Габрово - последствия #2

От Градище към телевизионната кула по пътеката.


Телевизионната кула - разни неща паднали.


От кулата по пътя надолу.


През гората наодлу. Пътят е непроходим и пеша!


Tuesday, March 19, 2013

Ураганен вятър в Габрово - последствия.

Ето малко снимки от последствията от урагана на 14.03.2013 в Габрово.


Гората над "Петкова Нива"


Местност "Градище"


Полянката до "Горското Ханче"


Такова чудо лично аз никога не бях преживявал.

Tuesday, March 12, 2013

Debian GNU/Linux mounting Novell NetWare volumes

This is example of mounting Novell NetWare 5.1 partitions with Debian GNU/Linux (in this case - unstable with kernel 3.2.0).

First we need ncpfs package.

# apt-get install ncpfs

Then we need ncpfs module in kernel (it comes with debian kernel).

# modprobe ncpfs

Novell Context is support.gabrovo.hq
Username is niki
Server IP address is 10.1.42.24
Volume to mount is called - data

# ncpmount -o tcp -S 10.1.42.24 -A 10.1.42.24 -U niki.support.gabrovo.hq -V data /mnt/
Logging into 10.1.42.24 as NIKI.SUPPORT.GABROVO.HQ
Password:
# ls -la /mnt/
total 5
drwxr-xr-x  1 root root  512 Jan  1  1986 .
drwxr-xr-x 24 root root 4096 Mar  7 14:12 ..
dr-xr-xr-x  1 root root  512 Mar 12 13:57 MAN

# df -h
Filesystem                                              Size  Used Avail Use% Mounted on
rootfs                                                  389G   23G  362G   6% /
udev                                                     10M     0   10M   0% /dev
tmpfs                                                   596M  848K  595M   1% /run
/dev/disk/by-uuid/2e00092b-1986-4e86-9887-996ff2949e05  389G  23G  362G   6% /
tmpfs                                                   5.0M     0  5.0M   0% /run/lock
tmpfs                                                   3.4G  172K  3.4G   1% /run/shm
10.1.42.24/NIKI.SUPPORT.GABROVO.HQ                               137G 132G  4.9G  97% /mnt
Mount options and what they mean as follow:
-o tcp - use tcp (or -o udp)
-S 10.1.42.24 - server name/ip address.
-A 10.1.42.24 - which server to ask for name addresses.
-U niki.support.gabrovo.hq - niki is the user name and support.gabrovo.hq is context tree.
-V data - name of the volume to mount - "data".

If you did something wrong when mounting you can clear all your connections to novell with the following command:

# ncplogout -a

Monday, March 4, 2013

Installing skype on Debian Unstable amd64

Installing skype on 64bit linux is easy but how to do it is hard to find on the skype site. Here is what you need to do.

In this case I will show how to install skype on Debian GNU/Linux Unstable amd64. First download the skype package from skype.com - Skype for Debian 7.0 (multiarch).

Install it with the following command:

# dpkg -i --force-all skype-debian_4.1.0.20-1_i386.deb

Now you have installed skype but it will not work because of missing libraries. You can see what is missing with the following command:

# ldd `which skype`
        linux-gate.so.1 =>  (0xf7793000)
        libasound.so.2 => not found
        libXv.so.1 => not found
        libXss.so.1 => not found
        librt.so.1 => /lib32/librt.so.1 (0xf776d000)
        libdl.so.2 => /lib32/libdl.so.2 (0xf7769000)
        libX11.so.6 => not found
        libXext.so.6 => not found
        libQtDBus.so.4 => not found
        libQtWebKit.so.4 => not found
        libQtXml.so.4 => not found
        libQtGui.so.4 => not found
        libQtNetwork.so.4 => not found
        libQtCore.so.4 => not found
        libpthread.so.0 => /lib32/libpthread.so.0 (0xf774e000)
        libstdc++.so.6 => not found
        libm.so.6 => /lib32/libm.so.6 (0xf7727000)
        libgcc_s.so.1 => /usr/lib32/libgcc_s.so.1 (0xf770a000)
        libc.so.6 => /lib32/libc.so.6 (0xf75a8000)
        /lib/ld-linux.so.2 (0xf7794000)

As we see there are missing libs and this happens because skype deb package is build for i386 arch and we have amd64.

We need to add another architecture to apt with the following command:

# dpkg --add-architecture i386
# apt-get update

Now we can install missing libs:

# apt-get -f install

This will download and install missing i386 libs. Now you can start skype.

Note: You can install any package by adding :i386 or :amd64 after the package name: apt-get install  tcpdump:i386

Friday, February 1, 2013

Подмяна на диск в 3ware 9650SE SATA-II RAID

Наскоро се сбъсках с такъв контролер - 3ware 9650SE и понеже нямах достъп до web интерфейса му се наложи да направя rebuild направо от конзолата. Командите са доста смаяни и дълги и за да не ги забравя реших  да си ги напиша тук.

Драйверите и програмката се теглят от техния сайт - http://www.3ware.com/support/. Командите се изпълняват с command line tool-а tw_cli.

# tw_cli info c4

Unit  UnitType  Status         %RCmpl  %V/I/M  Stripe  Size(GB) Cache  AVrfy
------------------------------------------------------------------------------
u0    RAID-1    DEGRADED     0%      -       -       1862.63   OFF    ON    

Port   Status           Unit   Size        Blocks        Serial
---------------------------------------------------------------
p0     OK               u0     1.82 TB     3907029168 JK1181YAJ283BV     
p1     DEVICE-ERROR     u0     1.82 TB     3907029168 WD-WMAY00539006

Където c4 е котролер номер 4, u0 = unit 0

Както се вижда, 2рия диск от RAID1 e счупен.

След като подменим диска, rebuild процеса би трябвало да тръгне сам. Ако това не стане вероятно не е пуснат автоматичния rebuild. Това се прави с командата:

# tw_cli /c4 set autorebuild=on

Текущото състояние на контролера можем да видим с (примера е след като е приключил rebuild процесът:

# tw_cli /c4 show
Unit  UnitType  Status         %RCmpl  %V/I/M  Stripe  Size(GB)  Cache  AVrfy
------------------------------------------------------------------------------
u0    RAID-1    OK             -       -       -       1862.63   OFF     ON    

Port   Status           Unit   Size        Blocks        Serial
---------------------------------------------------------------
p0     OK               u0     1.82 TB     3907029168    JK1181YAJ283BV     
p1     OK               u0     1.82 TB     3907029168    5YD31BS0           

Както се вижда, cache опцията се изключва автоматично при "счупен" raid. След като raid-а е възстановен, можем да пуснем кеширането отново:


# tw_cli /c4/u0 set cache=on
Setting Write Cache Policy on /c4/u0 to [on] ... Done.
 
# tw_cli /c4 show

Unit  UnitType  Status         %RCmpl  %V/I/M  Stripe  Size(GB)  Cache  AVrfy
------------------------------------------------------------------------------
u0    RAID-1    OK             -       -       -       1862.63   ON     ON    

Port   Status           Unit   Size        Blocks        Serial
---------------------------------------------------------------
p0     OK               u0     1.82 TB     3907029168    JK1181YAJ283BV     
p1     OK               u0     1.82 TB     3907029168    5YD31BS0           

Това е...

Saturday, January 12, 2013

How to debug qmail with simscan, clamav and spamassassin

How to debug qmail with simscan, clamav and spamassassin?

Qmail sends this error "451 mail server temporarily rejected message (#4.3.0)" and all messages are rejected but in logs there is nothing suspicious. How can this be debugged?

You need to edit your /etc/tcp.smtp and add some debug variables. Normally the file looks like this:

127.0.0.1:allow,RELAYCLIENT="",QMAILQUEUE="/usr/sbin/simscan"
:allow,QMAILQUEUE="/usr/sbin/simscan"

Modify your settings like this:

127.0.0.1:allow,RELAYCLIENT="",QMAILQUEUE="/usr/sbin/simscan"
:allow,SIMSCAN_DEBUG="2",NOP0FCHECK="1",QMAILQUEUE="/usr/sbin/simscan"

Make sure that QMAILQUEUE points to the right path of simscan.
Recompile your /etc/tcp.smtp

# tcprules /etc/tcp.smtp.cdb /tmp/t.tmp < /etc/tcp.smtp

Now logs are filled with needed information and you can debug your problem. Remember to remove debugging after the problem.

Example debug output:
# tail -f /var/log/qmail/smtpd/current
@4000000050f019b9351afa74 simscan: cdb looking up
@4000000050f019b9351c2f0c simscan: cdb for  found clam=yes,spam=yes,spam_hits=4.9
@4000000050f019b93521b51c simscan: pelookup clam = yes
@4000000050f019b93521b904 simscan: pelookup spam = yes
@4000000050f019b93521c0d4 simscan: pelookup spam_hits = 4.9
@4000000050f019b93521c8a4 simscan: starting: work dir: /var/qmail/simscan/1357912495.891056.16277
@4000000050f019bb13bc6804 simscan: pelookup: called with xxxasd@safds.com
@4000000050f019bb13bc9acc simscan: pelookup: domain is safds.com
@4000000050f019bb13bc9eb4 simscan: cdb looking up safds.com
@4000000050f019bb13bcae54 simscan: pelookup: local part is gxxxx
@4000000050f019bb13bccd94 simscan: cdb looking up xxxasd@safds.com
@4000000050f019bb13bce8ec simscan: pelookup: called with gxxxx@stemo.bg
@4000000050f019bb13bcfc74 simscan: pelookup: domain is stemo.bg
@4000000050f019bb13bd005c simscan: cdb looking up stemo.bg
@4000000050f019bb13bd1bb4 simscan: cdb for stemo.bg found clam=yes,spam=yes,spam_hits=5.7
@4000000050f019bb13bd2f3c simscan: pelookup clam = yes
@4000000050f019bb13bd2f3c simscan: pelookup spam = yes
@4000000050f019bb13bd3324 simscan: pelookup spam_hits = 5.7
@4000000050f019bb13bd46ac simscan: pelookup: local part is gxxxx
@4000000050f019bb13bd46ac simscan: cdb looking up gxxxx@stemo.bg
@4000000050f019bb13c65ecc simscan: calling clamdscan
@4000000050f019c110b86b1c simscan: fatal error executing clamdscan
@4000000050f019c110ba6304 simscan: exit error code: 71

Wednesday, January 9, 2013

Joomla FTP Layer - permissions and solution

When using commercial hosting with CPanel interface with Joomla you can be stuck by problem with file permissions. Errors like these are common:
Warning: Failed to move file!
The problem occurs  when uploading and installing modules/templates in Joomla admin interface. There are a lot of advises out there that suggest you to do "chmod 777 somedir" to resolve this problem. This is BAD solution and should never be used. Here is explanation why is this happening and how can you fix it without changing permissions.

When you buy hosting you get username/password for CPanel and ftp account which are identical. Installing Joomla on such hosting is not a problem but when trying to install template/module in Joomla admin panel you can see the above error message.

When uploading and installing files from Joomla admin panel, uploaded file is set to different owner than your username for the hosting. Uploaded file is owned by user started the apache web server. On most linux distributions it is www, www-data, http and so on. So when uploaded with different user the file can't even be deleted by your account and you need to contact hosting administrator to delete it for you. What you need to do is to make Joomla upload file with your hosting username/password. This is done by enabling FTP layer in Joomla global configuration tab and filling it with the right data (user/pass/ftp root). This can be done on installation process of Joomla but it is disabled by default. If you don't do this the final process of writing configuration.php will fail and you need to save and upload it manually.

How to enable it manually. Lets assume that your Joomla installation at address http://yousite.com/joomla. If you login in CPanel you will see that your home directory is something like "/home/username/". Document root of the web server is /home/username/public_html and Joomla is installed in /home/username/public_html/joomla. Here is configuration.php for ftp layer:

public $ftp_host = '127.0.0.1'; // change ftp ip address here
public $ftp_port = '21';
public $ftp_user = 'username';
public $ftp_pass = 'password';
public $ftp_root = 'public_html/joomla/';
public $ftp_enable = '1';

This should solve the problem with user mismatch when uploading modules/templates.
Other is hosting provider to support suPHP which is better solution to this problem.